martes, 27 de agosto de 2013

ROAST BEEF

FONDO OSCURO DE RES
MODO DE ELABORACIÓN
  1. Colocar el hueso de res en un escofier o charola y poner en el horno previamente precalentado, a 200o C durante aproximadamente 40 min. o hasta que esté bien dorado.
  2. Poner todas las verduras y el puré de tomate en el escofier, y llevar al horno durante 15-20 min. mas, hasta que empiecen a caramelizar.
  3. Vaciar las verduras y los huesos en una olla grande con el agua y llevar a ebullición.
  4. Desgrasar y desglasar los escofier con agua fría, y el resultado añadirlo al fondo.
  5. Llevar a ebullición y cocer, a fuego medio-bajo durante unas 6-8 horas, espumando
    constantemente. Añadir el Bouquet.
  6. Colar y enfriar para uso posterior.


PAPAS CUBO                             
MODO DE ELABORACIÓN
  1. Lavar y pelar las papas. Reservar en agua para evitar su oxidación.
  2. Cortar los distintos tipos de cubos y reservar en agua por separado.
  3. Cocción de los cubos “Parmentière”: blanquear a partir de agua fría y terminar
    cocción salteando en mantequilla, escurrir, salar y servir.
  4. Cocción de los cubos Rissolé: en crudo incorporar los cubos de papa en mantequilla
    y aceite, conducir la cocción regulando la temperatura. Escurrir y salar. 
ROAST BEEF CON VEGETALES EN DIFERENTES COCCIONES    


INGREDIENTES
Rib eye
Zanahoria Kg 1 pieza entera
pza Pelada, mirepoix
Apio 2 rama Mirepoix
Poro 1 pza Mirepoix
Cebolla 2 pza Mirepoix
Ajo 1/2 cabeza Écrasé
Aceite vegetal
Bouquet Garní

Hoja de poro, tomillo, tallo de pza perejil, hoja de apio, laurel
Fondo de res oscuro   50 ml   Lt Ligado   pza Pont Neuf (5cmx1cm)  pza Medias lunas
Hilo para bridar c/s Pimienta negra molida c/s
Para los vegetales:
Papa grande  Calabaza italiana 2
2 Jitomate 2 pza Gajos Acelga o espinaca
50 grs Chiffonnade Mantequilla 30 grs

Pimienta negra molida c/s  Sal c/s


MODO DE ELABORACIÓN
Ramas Perejil y albahaca
Salpimentar la carne y bridar de ser necesario.
1. Sellar la carne en una olla o sartén profundo con aceite caliente. Reservar.
2. Incorporar los vegetales y desglasar con el fondo.
3. Agregar el bouquet Garní, la carne, tapar y cocinar en horno a 180° C por espacio 
de 20 min.
4. Retirar del horno, sacar la carne y reposar.
 Colar los jugos de cocción y reducir a la consistencia deseada. Sazonar.
Para los vegetales:
1. Limpiar y desinfectar los vegetales.
2. Cortarlos y blanquearlos según la demostración del Chef.
3. Saltearlos con mantequilla y sazonar. Reservar.
Para el montaje:
1. Rebanar la carne.
2. Presentar la carne en un plato (150 grs). La proteína siempre se ubica en la parte 
baja del plato.
3. Disponer los vegetales buscando altura y combinación de colores.
4. Salsear, decorar con las hierbas y servir.


sábado, 24 de agosto de 2013

Lattice-Topped Pie

Lattice-Topped Pie


Fold back alternating strips 
Fold back every other dough strip halfway over itself. Place a strip at a sharp angle across the unfolded strips, then return the folded strips to their flat position.

Weave the dough 
Fold back the remaining 3 strips, place a dough strip about 1 inch away from the first one, and return the folded strips to their flat position. Repeat to complete the lattice.

Ingredients:


    • 1 1/4 cups unbleached all-purpose flour
    • 1 Tbs. sugar
    • 1/4 tsp. salt
    • 8 Tbs. (1 stick) cold unsalted butter, cut into 1/4-inch cubes
    • 3 Tbs. very cold water

    Directions:

    To make the dough by hand, in a large bowl, stir together the flour, sugar and salt. Using a pastry cutter or 2 knives, cut the butter into the flour mixture until the texture resembles coarse cornmeal, with butter pieces no larger than small peas. Add the water and mix with a fork just until the dough pulls together.

    To make the dough in a stand mixer, fit the mixer with the flat beater, and stir together the flour, sugar and salt in the mixer bowl. Add the butter and toss with a fork to coat with the flour mixture. Mix on medium-low speed until the texture resembles coarse cornmeal, with the butter pieces no larger than small peas. Add the water and mix on low speed just until the dough pulls together.

    Transfer the dough to a work surface, pat into a ball and flatten into a disk. (Although many dough recipes call for chilling the dough at this point, this dough should be rolled out immediately for the best results.) Lightly flour the work surface, then flatten the disk with 6 to 8 gentle taps of the rolling pin. Lift the dough and give it a quarter turn. Lightly dust the top of the dough or the rolling pin with flour as needed, then roll out into a round at least 12 inches in diameter and about 1/8 inch thick. Makes enough dough for one 9-inch single-crust pie or one 10-inch galette.

    To make a double-crust pie: Double the recipe, cut the dough in half and pat each half into a round, flat disk. Roll out one disk into a 12-inch round as directed and line the pan or dish. Press any scraps trimmed from the first round into the bottom of the second disk. Roll out the second dough disk into a round at least 12 inches in diameter and about 1/8 inch thick and refrigerate until ready to use.

    To make a lattice top: Double the recipe, cut the dough in half and pat one half into a round, flat disk. Roll out the disk into a 12-inch round as directed and line the pan or dish. Trim the edge of the dough, leaving a 1/2-inch overhang. Press any scraps trimmed from the first round into the bottom of the remaining dough half. Pat the dough into a rectangle and roll out into a rectangular shape about 1/8 inch thick. Trim to cut out a 14-by-11-inch rectangle and refrigerate until ready to use.

    Nut Dough Variation: Add 2 Tbs. ground toasted pecans, walnuts, almonds or hazelnuts to the flour mixture and proceed as directed.

    Make-Ahead Tip: Pie dough may be made ahead and frozen for up to 2 months. To freeze, place the dough round on a 12-inch cardboard circle and wrap it well with plastic wrap. Alternatively, use the round to line a pie pan or dish, flute the edge and wrap well.


    viernes, 23 de agosto de 2013

    molinillo para la preparación de chocolate espumoso


    molinillo para la preparación de chocolate espumoso

    El Museo del Chocolate tendrá en su #NocheDeMuseos la conferencia "La ciencia detrás del uso del molinillo para la preparación de chocolate espumoso" a las 20 horas. También habrán visitas guiadas a las 19, 20 y 21 horas. Y talleres de chocolate a las 19:30, 20:30 y 21:30 horas.

    *El museo está en Milán #45, en la colonia Juárez. El precio especial nocturno es de $30 a adultos y $20 a menores de edad, estudiantes y tercera edad. En esta ocasión no habrá reservaciones, pero sugerimos llegar con anticipación para alcanzar lugar a las visitas guiadas y talleres.


    domingo, 18 de agosto de 2013

    How to Make Fresh Pasta


    How to Make Fresh Pasta


    Making pasta from scratch is easier than you may think. And not only will you be able to taste the difference in the finished product, you’ll also know exactly what ingredients went into it.

    Here, we demonstrate two ways to make fresh pasta: by machine and by hand. The first is faster, but it requires special equipment; the second is a labor of love, ideal for a leisurely weekend or group activity. Either way, you’ll be rewarded with flavorful, slightly chewy strands made with just flour, eggs, olive oil and a pinch of salt — the perfect foundation for any pasta dish. Start with the basic recipe below, then read on for step-by-step 


    instructions.

    Egg Pasta
    Makes 1 lb. (500 g.)

    2 1/2 cups (12 1/2 oz./390 g.) unbleached all-purpose or “00 flour, plus more flour as needed
    1/4 tsp. fine sea salt
    4 large eggs, at room temperature
    2 tsp. olive oil


    Spaghettini with Summer
    Squash & CrispySpeck

    This recipe combines the sweetness of summer squash with the smokiness of speck. It is also gorgeous to look at: strands of thin spaghettini intertwined with bright green and yellow ribbons of squash and rosy flecks of ham.
    Ingredients:
                Fine sea salt, to taste, plus 1/4 tsp.
                2 Tbs. extra-virgin olive oil
                4 oz. (125 g) Italian speck, cut into small dice
                3 garlic cloves, very thinly sliced
                1 lb. (500 g) mixed zucchini and yellow summer squash, sliced
  very thinly lengthwise using a mandoline or vegetable peeler,
  then cut into thin strips
                Freshly ground pepper, to taste
                2 Tbs. finely shredded fresh basil
                1 lb. (500 g) dried spaghettini
                1/2 cup (2 oz./60 g) grated Parmigiano-Reggiano cheese
    Directions:
    Bring a large pot of salted water to a boil over high heat.

Meanwhile, in a large fry pan over medium heat, combine the olive oil and speck and sauté until the speck is crispy, about 7 minutes. Add the garlic and sauté until it just begins to turn golden, about 3 minutes.

Add the squash and toss well to coat the strands with the oil. Season with the 1/4 tsp. salt and a generous grinding of pepper. Increase the heat to medium-high and cook until the squash is just tender, 3 to 4 minutes. Stir in the basil and remove from the heat. Cover the sauce to keep warm.


    Add the pasta to the boiling water, stir and cook until al dente, about 9 minutes or according to the package instructions. Drain the pasta, reserving about 1/2 cup (4 fl. oz./125 ml) of the cooking water. Transfer the pasta to the pan with the sauce. Using tongs or a pasta fork, toss gently to combine. Add a splash or two of the pasta-cooking water to loosen the sauce, if needed. Sprinkle with the cheese and toss again. Season with salt and pepper.

    domingo, 19 de mayo de 2013

    Menú para un Domingo Bo Chef

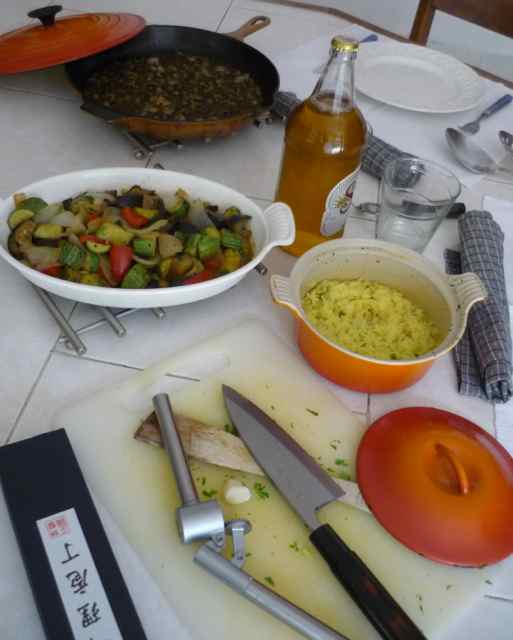
    Menú para un Domingo Bo Chef Machaca con salsa de Zarzamora- Arroz con Cúrcuma – Ratatouille Rata tui Este platillo original de la región del mediterráneo , se puede combinar muy bien tanto con carne como con pescado ahora lo integramos a una receta mexicana como acompañamiento de la Machaca campestre. Machaca campestre . 100 gramos de machaca media cebolla finamente cortada medio poro un chile verde perejil y cilantro un diente de ajo. Ponemos a sazonar la cebolla y el ajo agregamos el poro Y una ves acitronado integramos la machaca y el perejil y cilantro finamente cortado Con el cuchillo “Deba Boucho” Una vez integrado agregamos vino para cocinar , media taza de agua y salsa de zarzamora A fuego lento tapamos y cocinamos por cinco minutos. Rata tui Cortar una cebolla a trozos grandes cuadrados, hacer lo mismo con la berenjena , la calabaza, y el pimiento morrón , Calentar el sartén y agregar un poco de aceite en donde poneos a freír el ajo , la cebolla Una vez acitronado agregamos el pimiento y la berenjena posteriormente la calabaza , hierbas de provece y sal. Tapar el sartén y cocinar a fuego lento , aumentar un cuarto de taza de agua . Ingredientes Una berenjena Una cebolla grande Un pimiento morrón Dos calabazas Un diente de ajo Arroz con cúrcuma El arroz se puede hacer de manera tradicional , solo aumentamos perejil y cúrcuma una vez que lo coloquemos a fuego lento y con tapa. BOCHEF 2013-05-19


    sábado, 16 de marzo de 2013

    "deba boucho"


    BoChef El cuchillo se llama "deba boucho". Es muy filoso y pesa mucho. Esta creado para cortar el hueso del pescado , por ello el peso , esta calculado primordialmente para cortar con un filo espectacular para hacer "sashimi" De ahí sus finas lajas (pescado finamente cortado). Este filo que hay que cuidar en todos los aspectos no se pierde fácilmente pues el acero japonés es de un temple excepcional Sin embargo cuando llega el momento de afilarlo de nuevo Hay que hacerlo con una piedra especial y solo deslizarlo en un solo sentido y lado. Adjunto en la presente una foto de nuestra pesca.( Keiichi Tanaka ) El cuchillo "deba boucho" También se puede usar para cortar el hueso de pollo. Realmente una maravilla para la cocina Aquí presento un espagueti acompañado con salsa de perejil a la crema y lajas de salmón . Bo Chef Marzo2013-03-16 Keiichi Tanaka esta dedicado a la investigación del Arte Japonés en México , pero también es un gran pescador y cocinero japonés Aquí en la foto ha salido a pescar una buena dotación de besugos Que posteriormente compartirá con sus amigos Keiichi además de ser un buen amigo comparte conmigo el gusto del arte y la cocina BoChef

    jueves, 3 de enero de 2013

    Rosca de Reyes

    Rosca de Reyes Ingredientes 600 gr de harina 12 gr de levadura en polvo 150 gr de azúcar 10 gr de sal 180 gr de mantequilla 150 ml de leche 30 ml de esencia de vainilla 1 naranja 6 huevos (1 para barnizar) 150 gr de acitrón 50 gr de azúcar para espolvorear 3 muñecos de plástico Para preparar la costra de dulce 200 gr de manteca vegetal 200 gr de harina 200 gr de azúcar glas 10 ml de esencia de vainilla 2 huevos Preparación
    
Mezclar la harina, la levadura, el azúcar, la sal y la naranja (en ralladura) para lograr una especie de masa a la cual, tendrás que verterle los huevos, un poco de leche y también algo de esencia de vainilla. Una vez que la masa este uniforme, hay que añadir mantequilla y un poco de leche. Amasa hasta lograr un cuerpo de consistencia elástica y coloca éste ya en un molde dejándolo reposar hasta que doble o aumente su volumen considerablemente. Después , comienza a darle forma a tu rosca extendiéndola con tus manos y aprovecha este proceso para introducirle un muñequito sorpresa. Para preparar las costras de dulce , haz una mezcla de manteca con azúcar y poco a poco ve incorporándole harina y algunas yemas de huevo. Después, bate hasta lograr una especie de pasta espesa la cual, deberás dejar reposar por unos instantes. Finalmente, barniza un poco la rosca con el último huevo y decora ésta con la pasta que, una vez lista, formará las costras de acompañando éstas con algunas piezas de acitrón cortado para lograr el diseño final de la Roscas de Reyes. Una vez lista tu rosca, espolvorea un poco de azúcar y deja hornear la pieza completa por aproximadamente 40 minutos, a una temperatura promedio entre 180 y 190°.